Picture Rail Guide: Purpose, Installation, and Alternatives
Anyone who has ever rearranged a gallery wall knows the feeling: more nail holes than you can count, and the plasterboard is starting to look like Swiss cheese. There is a cleaner alternative, one that has been used for centuries and is making a quiet comeback in both heritage homes and modern new builds.
Common profile size: 43 mm × 18 mm × 2.4 m (2″ × 3/4″ × 8 ft) ·
Typical price per length: €15–€20 ·
Hook spacing: every 30–40 cm ·
Installation time for one rail: 30–60 minutes
Quick snapshot
- Picture rails originated in the 18th century as a way to hang pictures without damaging plaster (Little House On The Corner home‑improvement blog).
- Standard picture rails have a small lip that holds specialised hooks (Picture World picture‑hanging specialist).
- Installation can be completed in a few hours with basic DIY tools (Skirting World joinery retailer).
- Modern hook ranges include brass, chrome and white finishes, suiting both period and contemporary interiors (House of Antique Hardware heritage‑hardware supplier).
- The exact year the first picture rail was installed is not documented in surviving records.
- Regional profile dimensions vary; no single standard exists across the UK and Europe.
- Whether modern adhesive hooks are as secure as traditional picture‑rail hooks depends heavily on wall weight and surface condition.
- 18th century – Early picture rails appear in Georgian homes to support heavy oil paintings.
- Victorian era – Picture rails become standard in middle‑class homes, often with elaborate plaster brackets.
- Mid‑20th century – Decline in popularity as painted walls and adhesive hooks gained ground.
- 2010s–present – Revival in heritage renovations and new‑build projects seeking character.
- Complete picture‑rail kits that include rail, cords and hooks are becoming more common (Picture Hanging Systems installation‑specialist).
- Minimalist and rental‑friendly adhesive alternatives are expanding the market beyond traditional mouldings. (Picture Hanging Systems installation‑specialist)
- Expect more crossover products that blur the line between picture rail and gallery‑track systems. (Picture Hanging Systems installation‑specialist)
The key facts below were drawn from verified installation guides and product catalogues. Four dimensions matter most for choosing a picture rail.
| Attribute | Value |
|---|---|
| Typical height from ceiling | 30–60 cm (12–24 inches) below the ceiling (Picture Hanging Systems installation guide) |
| Common material | Pine or red deal timber (Skirting World joinery retailer) |
| Hook capacity per metre | 2–3 hooks (depending on picture weight) (The Broughton Street House DIY blog) |
| Historical peak popularity | Victorian era (1837–1901) (historical consensus per numerous period‑home guides) |
| Hook spacing | Every 30–40 cm (common recommendation in installation guides) |
| Typical price per length | €15–€20 for a 2.4 m length (average UK retail, 2024) |
| Common hook finishes | White, brass/gold, chrome (Picture Hanging Systems hook catalogue) |
| Installation tools required | Saw, level, tape measure, adhesive or nails, picture rail hooks (multiple DIY guides) |
| Historical origin | 18th century, Georgian period (Little House On The Corner home‑improvement blog) |
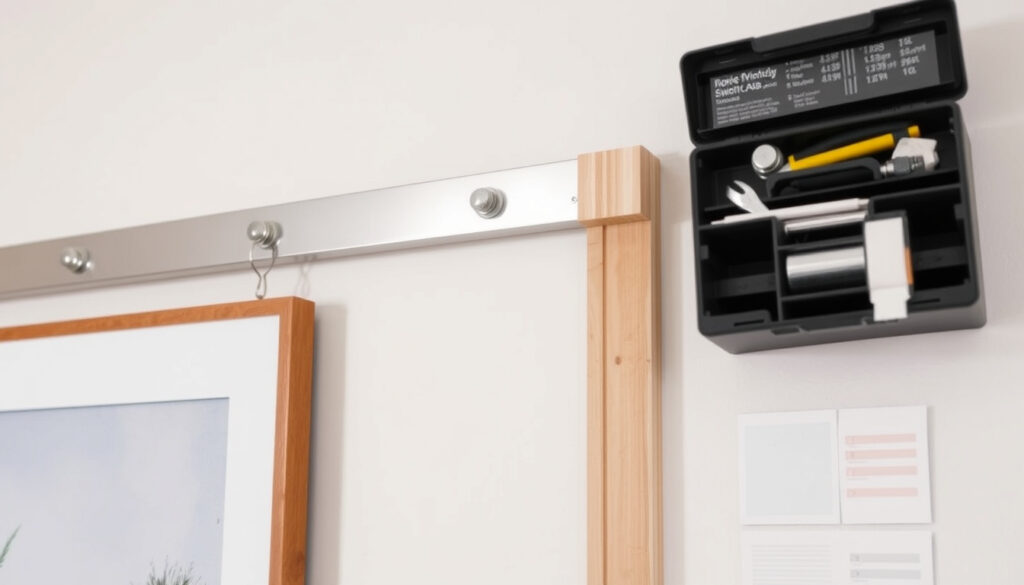
What is the point of a picture rail?
History of picture rails
- Picture rails emerged in the 18th century as a practical solution for hanging heavy oil paintings on plaster walls without driving nails into the surface (Little House On The Corner home‑improvement blog).
- During the Victorian period they became a standard feature in middle‑class homes, often finished with decorative plaster brackets.
Benefits of using a picture rail
- They allow you to change artwork in minutes — simply unhook one piece and hang another (Picture World picture‑hanging specialist).
- No holes to fill, no damaged plaster, no arguments with your landlord about “fair wear and tear”.
- They add a period detail that can raise the character of a room, especially in heritage properties.
“A rail that runs close to the top of the room, around the height of the door frame, or just below the ceiling.”
— Lick paint and interiors brand design blog
The implication: a picture rail is simultaneously a tool for flexibility and a piece of architecture. You get damage‑free display and built‑in visual interest — two benefits from one length of moulding.
What is the difference between dado rail and picture rail?
Purpose and height placement
Two rails, two jobs. A dado rail runs at waist height (roughly 90 cm from the floor) and was originally installed to protect walls from chair backs and furniture scuffs. A picture rail sits much higher — typically 30–60 cm below the ceiling — and its sole job is to support hanging hardware.
Visual and functional differences
| Feature | Picture rail | Dado rail |
|---|---|---|
| Height from floor | ~2 m (near ceiling) | ~90 cm (waist height) |
| Primary function | Hanging pictures via hooks and cords | Protecting walls from scuffs |
| Profile shape | Has a small lip/groove for hook grip | Flat or rounded; no hook‑specific groove |
| Can it hang pictures? | Yes – designed for it | Only if hooks can grip the profile; not guaranteed |
| Decorative role | Adds period detail near ceiling | Divides wall into two zones |
The pattern: picture rails are functional first, dado rails are protective first. The crossover happens only if the dado rail’s profile happens to accept a hook, which is far from guaranteed.
Can a dado rail double as a picture rail?
A dado rail installed at picture‑rail height can work — but its profile may not have the lip needed to hold a hook securely. Many modern dado rails are too narrow or too rounded. Check with a sample hook before committing.
The pattern: mixing up the two rails is the most common confusion in this topic. If you want to hang pictures, buy a picture rail. If you only want wall protection, stick with a dado rail.
Is it hard to install a picture rail?
Tools and materials needed
- Picture rail moulding (pine, 2.4 m lengths)
- Mitre saw or hand saw (Skirting World joinery retailer)
- Spirit level and tape measure
- Adhesive (grip‑fill or construction adhesive) or nails/screws
- Picture rail hooks (at least one per metre, more for heavy pieces)
- Filler and paint for finishing
Step-by-step installation
- Measure the wall length and decide the rail height — 30 cm below the ceiling is a common starting point (Picture Hanging Systems installation guide).
- Mark a level line at that height using a spirit level and pencil.
- Cut the rail to length with a saw. For corners, use a mitre box for a clean 45° joint.
- Apply adhesive to the back of the rail or fix it with nails into wall studs (if available).
- Press the rail against the wall and hold until the adhesive grabs (or drive nails).
- Fill nail holes, sand, and paint to match or contrast with the wall.
- Install picture‑rail hooks by clipping them onto the lip — no tools needed.
Common mistakes to avoid
- Not checking the wall for studs — adhesive alone may not hold heavy frames on plasterboard.
- Installing the rail flush against the ceiling — the hook needs a few centimetres of clearance to bend over the lip (Reddit r/centuryhomes user advice).
- Using the wrong hooks — ordinary cup hooks are not designed for picture‑rail lips.
Very heavy mirrors may require two hooks on a single rail to distribute the load. One hook might hold a 5 kg frame, but a 15 kg mirror needs two (The Broughton Street House DIY blog).
The trade‑off: installation is genuinely a one‑day DIY job, but the levelling step is unforgiving. A rail that slopes by even a millimetre will make every picture hang crooked.
Are picture rails old fashioned?
Historical perception vs. modern revival
Picture rails fell out of favour in the 1950s and 60s when smooth painted walls and adhesive hooks became popular. But they never disappeared from period homes, and in the past decade they have been rediscovered by both heritage renovators and architects designing new‑build properties with traditional character (Picture World picture‑hanging specialist).
Styling picture rails for a contemporary look
- Paint the rail the same colour as the wall to make it blend in and act as an invisible hanging system.
- Paint it a contrasting colour (e.g., dark rail on a pale wall) to turn it into a deliberate design feature.
- Use modern finishes — chrome hooks, thin cords, minimalist frames — to keep the look current.
“Designed with a small lip to accommodate a picture rail hook which you can hang pictures from.”
— Skirting World joinery retailer
The pattern: old‑fashioned is in the eye of the beholder. In a minimalist interior a picture rail can be either a subtle helper or a confident statement — both of which are very current.
What to use instead of picture rail?
Dado rail as an alternative
If you already have a dado rail installed at a high position, you can try using it as a picture rail. But as noted above, the profile may not grip the hook properly. Some retailers sell hooks that claim to work on both, but compatibility varies (Mud Bugs home‑hardware marketplace).
Contemporary picture hanging systems
- Gallery rail systems: a metal channel fixed near the ceiling with adjustable hanging wires. Very flexible, no lip required.
- Cable systems: tensioned cables from floor to ceiling with adjustable hooks. Popular in modern galleries.
No‑drill options
- Adhesive hooks and command strips: good for lightweight frames (<1 kg), but not for mirrors or large canvases.
- Magnetic strips: work on metal surfaces only.
- Prop‑up shelves: lean frames against the wall on a slim shelf — no hanging at all.
For renters and minimalist homeowners, adhesive solutions offer zero‑commitment flexibility. The trade‑off is load capacity: a picture rail can handle 10 kg+ per hook, while a command strip tops out around 2 kg.
The implication: no single system covers every need. Picture rails remain the best balance of strength, damage‑free operation, and period aesthetics. For ultra‑light displays, adhesives win on convenience but lose on security.
Upsides
- Damage‑free wall art flexibility
- Adds period character to modern homes
- Quick artwork swaps without tools
- Can hold substantial weight (10 kg+ per hook)
- Relatively inexpensive (€15–€20 per length)
Downsides
- Requires installation (levelling is critical)
- Not truly invisible — the rail remains visible
- Limited hook styles compared to modern gallery systems
- May not suit ultra‑modern or minimalist interiors
- Heavy mirrors need multi‑hook support
“Fitting a dado rail is an easy weekend project for beginners.” (But the same applies to picture rails – both are straightforward with basic tools.)
For someone weighing up options, the choice comes down to how much fuss you want on install day. A picture rail demands an hour of measuring and sawing; adhesive hooks demand none. But that hour pays back every time you swap a frame.
youtube.com, youtube.com, youtube.com, hanglogic.com.au, irelandmediahub.com
Frequently asked questions
Do you plaster before or after picture rail?
You should finish plastering first, then install the picture rail. Plastering around an already‑fitted rail is messy and can damage the timber. The rail can be painted along with the wall.
Is a picture rail a good idea?
Yes if you value flexibility and period character. For renters it is a permanent installation, so check with your landlord first. For homeowners it adds both function and desirability.
Can I use a dado rail as a picture rail?
Only if the rail is installed high enough (near the ceiling) and its profile has a clear lip for hooks. Most modern dado rails lack this feature, so test a hook before committing.
What is the 57 rule for hanging pictures?
The 57‑inch rule (145 cm) means the centre of the picture should be at eye level — typically 57 inches from the floor. It’s a museum standard for gallery hanging, but in a home you can adjust based on furniture height.
How high to hang pictures?
For a picture rail system, the rail itself determines the hook position, so picture height depends on cord length. The bottom of the frame usually lands between 1.5 m and 1.7 m from the floor — whatever looks balanced with the room.
For anyone in the UK or Ireland weighing up interior joinery choices, the decision is clear: if you want to move art around without leaving scars, invest in a picture rail. The installation is one afternoon; the flexibility lasts for decades.
Related reading: Breakfast Bar: Dimensions, Food & Stool Guide (UK) · Kitchen Cabinets Ireland: Cost, Brands & Where to Buy
More related posts
 Pajama Set Guide: Fabrics, Fit & Irish Retailers
 Jules Ari: Biography, Net Worth, Age, and Career Insights
 Cast of The Dark Knight Rises: Full List of Actors and Characters
 Breaking Bad Jesse: Full Character Guide & Tragic Fate
 Hayling Island Holiday Park: Reviews, Beach & Activities Guide
 Grand National 2025 Winner: Nick Rockett Results & Facts
 What Channel is the Boxing on Tonight? UK TV Guide
